Making Bonehead
A primer on procedural animation in Unity.
Introduction
What is procedural animation?
Or, put more simply, procedural animation is animation driven by code rather than keyframes. In the case of character animation, this can range from something as simple as blending between two animation clips depending on a character’s speed, to a fully procedural animation system with no influence from pre-generated data.
We will be exploring a simple implementation of the latter in this tutorial, namely the animation system used in the interactive Bonehead Sim, but all the same concepts can be used on top of traditional keyframe animations. The focus will be on the application of procedural animation elements rather than their inner workings, but if you are interested in the math behind it all, check out Alan Zucconi’s tutorial series on this subject.
There are a lot of links in this tutorial, but most of them are optional and only for further reading. You don’t need to read all the articles linked to follow along!
Fundamentals
Forward Kinematic (FK)
FK uses the rotation of an object’s parent to derive the child’s position and orientation. This is repeated for each child down the chain, so any given bone will influence all bones below it in the hierarchy. This only requires access to the joint transforms and is exposed by default in most game engines.
Inverse Kinematics (IK)
Inversely, IK takes a target position and a pole vector (the “elbow” direction) as an input, and rotates the bones in the chain to have it end up at the input position. This is commonly used for legs to keep them on a fixed position on the ground while the body is moving, or arms grabbing an object outside the skeleton hierarchy.
Particles / Verlets / Rigidbodies
This method is commonly used for floppy limbs and physics ragdolls. This method uses free-floating, velocity-driven objects which do not share a parent/child hierarchy to generate poses. By adding constraints, such as maximum angles and distances, we can derive limb placements for complex motions at runtime, like a person falling down a flight of stairs. While this is outside the scope of this tutorial, I want to mention this as it is a very commonly used technique and is not strictly built upon FK or IK like many other methods.
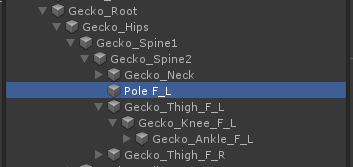
Setup
To get started, you will need a skeletal hierarchy of some sort. Unity (by default) does not distinguish between skeletal bones and regular transforms, so in a pinch, we can make our own skeleton to play with using basic shapes. If you use the placeholder skeleton, you can also play around and experiment by adding new limbs or changing the geometry.
- Placeholder Gecko Skeleton - Follow along writing the code yourself. (Recommended)
- Full Project - Explore the full project as you read.
To make things easier, be sure your pivots (joints) are oriented in predictable ways, such as all facing in the same direction and having zero local rotations in the default pose. This will make reasoning out how a bone chain should behave much easier.
This tutorial will assume your skeleton has its axes oriented as Z forward and Y up. If this is not the case, you will need to use offsets for each bone in order to use Unity’s built in functions. This can get confusing and hard to debug very fast, so I strongly suggest you to make sure your skeleton is set up properly!
Bonehead
To illustrate the different ways you can leverage these concepts to bring a character to life, we will be going through a simplified implementation of the animation system driving Bonehead in the video at the top of the page. This tutorial is intended to be accessible to beginners, so to keep it succinct, some of the more complex aspects will only be glossed over.
Single Bone Tracking
To get started, we will need to create a new Unity component to contain all our gecko logic. To do this, we define a MonoBehaviour class and declare references to our target object, as well as the gecko’s neck bone. This will expose them in the Unity inspector for easy linking.
using UnityEngine;

public class GeckoController : MonoBehaviour
{
  // The target we are going to track
  [SerializeField] Transform target;
  // A reference to the gecko's neck
  [SerializeField] Transform headBone;

  // We will put all our animation code in LateUpdate.
  // This allows other systems to update the environment first,
  // allowing the animation system to adapt to it before the frame is drawn.
  void LateUpdate()
  {
    // Bone manipulation code goes here!
  }
}
SerializeFieldlets you expose a variable in the Unity inspector without having to make it public.

Our goal for this part is to derive a Quaternion representing a rotation pointing from the head to our target. Quaternions can be a messy subject, but you don’t need to understand their inner workings to work with them. For simplicity’s sake, we will be treating quaternions as a black boxed “3D orientation” for the rest of this tutorial.
First, we subtract our head position from the target position. This will give us a vector pointing at the target from the head’s current position.
Vector3 towardObjectFromHead = lookObject.position - headBone.position;
To get an orientation facing the target, we use the Quaternion.LookRotation method. This method takes a Forward and Up direction, and outputs a rotation which, when applied to a transform, orients the transform so that its Z axis faces in the Forward direction, and its Y axis faces Up.
the
upparameter ofQuaternion.LookRotation(Vector3 forward, Vector3 up)can be thought of as a suggestion. The finalupvalue we get will be adjusted to be 90 degrees away from theforwardparameter, so we are safe in using the gecko’s up vector here (i.e.transform.up), even if the direction will be slightly off.
headBone.rotation = Quaternion.LookRotation(towardObjectFromHead, transform.up);
We are now telling the head bone to orient itself so that it looks in the direction from headBone to lookObject, and its up direction is that of the transform the GeckoController component is on, in this case the gecko root.
This is a good start, but there are still a couple of problems. The tracking looks unnatural because it’s instantaneous, and there are no limits on the turn angles.
To smooth out the tracking, we will need to add some damping. Many people are familiar with this method of easing using the following line to smoothly move to a target.
current = Mathf.Lerp(
  current,
  target,
  speed * Time.deltaTime
);
However, this is a poor implementation as it is frame rate dependent and will give inconsistent results. Instead, we will use a frame rate independent damping function by replacing the interpolation parameter to get the following:
current = Mathf.Lerp(
  current,
  target,
  1 - Mathf.Exp(-speed * Time.deltaTime)
);
To apply this to our gecko, we will need to interpolate a quaternion. Quaternions can be interpolated just like numbers and vectors, but because quaternions represent rotations, we will be using Slerp (Spherical Linear Interpolation). This is a lot like Lerp, except it follows the surface of a sphere instead of cutting a line through it to the target, giving a more consistent interpolation.
Quaternion targetRotation = Quaternion.LookRotation(
  towardObjectFromHead,
  transform.up
);
headBone.rotation = Quaternion.Slerp(
  headBone.rotation,
  targetRotation,
  1 - Mathf.Exp(-speed * Time.deltaTime)
);
This only leaves the angle constraints. For this, we will be using a single angle representing the maximum angle from the head’s default zero rotation in any direction. This can be done by converting the vector pointing toward our target from world space to the head’s local space.
Local transformations are relative to the object’s immediate parent, so we can use the head’s parent to make the conversion. First, we get a reference to the head’s parent via headBone.parent, then we call InverseTransformDirection on it. This transforms a direction from world space to local space.
Vector3 targetLocalLookDir = headBone.parent.InverseTransformDirection(targetWorldLookDir);
Using the head’s parent for transforming a direction is equivalent to zeroing the head’s rotation first, then transforming the direction using the head bone itself.
Once we have the target local direction, we can use Vector3.RotateTowards to limit the angle. This method takes a start direction, end direction, a maximum number of radians, and maximum change in length. We finally take the output from this method and use the Quaternion.LookRotation method we used before with it to get our final head rotation.
[SerializeField] Transform target;
[SerializeField] Transform headBone;
[SerializeField] float headMaxTurnAngle;
[SerializeField] float headTrackingSpeed;

void LateUpdate()
{
  // Store the current head rotation since we will be resetting it
  Quaternion currentLocalRotation = headBone.localRotation;
  // Reset the head rotation so our world to local space transformation will use the head's zero rotation.
  // Note: Quaternion.Identity is the quaternion equivalent of "zero"
  headBone.localRotation = Quaternion.identity;

  Vector3 targetWorldLookDir = target.position - headBone.position;
  Vector3 targetLocalLookDir = headBone.InverseTransformDirection(targetWorldLookDir);

  // Apply angle limit
  targetLocalLookDir = Vector3.RotateTowards(
    Vector3.forward,
    targetLocalLookDir,
    Mathf.Deg2Rad * headMaxTurnAngle, // Note we multiply by Mathf.Deg2Rad here to convert degrees to radians
    0 // We don't care about the length here, so we leave it at zero
  );

  // Get the local rotation by using LookRotation on a local directional vector
  Quaternion targetLocalRotation = Quaternion.LookRotation(targetLocalLookDir, Vector3.up);

  // Apply smoothing
  headBone.localRotation = Quaternion.Slerp(
    currentLocalRotation,
    targetLocalRotation,
    1 - Mathf.Exp(-headTrackingSpeed * Time.deltaTime)
  );
}
Eye Tracking
Next we want to add eye tracking. Before we do this, let’s split our code up a little by putting each feature in its own update method to make reading easier.
using UnityEngine;

public class GeckoController : MonoBehaviour
{
  [SerializeField] Transform target;
  [SerializeField] Transform headBone;
  [SerializeField] float headMaxTurnAngle;
  [SerializeField] float headTrackingSpeed;

  void LateUpdate()
  {
    HeadTrackingUpdate();
    EyeTrackingUpdate();
  }

  void HeadTrackingUpdate()
  {
  	// Previous LateUpdate code goes here
  }

  void EyeTrackingUpdate()
  {
  	// Eye tracking code will go here
  }
}
The order of updates here is important. Since the eyes are children of the head, any rotations of the head will in turn affect the eyes, so we want to make sure the head is updated first, then the eyes.
We will use the same approach as we used for the head to get the target rotation, but the difference here will be in the angle constraints. We don’t want the same angular limits for both eyes since the eyes’ range of motion are asymmetrical. We are also only going to constrain the rotation around their Y axis to keep things simple.
Let’s declare the variables we need. We want references to the eyes themselves, a tracking speed separate from the head’s tracking speed, and separate minimum and maximum rotation values for each eye.
[SerializeField] Transform leftEyeBone;
[SerializeField] Transform rightEyeBone;

[SerializeField] float eyeTrackingSpeed;
[SerializeField] float leftEyeMaxYRotation;
[SerializeField] float leftEyeMinYRotation;
[SerializeField] float rightEyeMaxYRotation;
[SerializeField] float rightEyeMinYRotation;
We can then smoothly approach the rotation toward the target, just like we did with the head.
// Note: We use head position here just because the gecko doesn't
// look so great when cross eyed. To make it relative to the eye
// itself, subtract the eye's position instead of the head's.
Quaternion targetEyeRotation = Quaternion.LookRotation(
  target.position - headBone.position, // toward target
  transform.up
);

leftEyeBone.rotation = Quaternion.Slerp(
  leftEyeBone.rotation,
  targetEyeRotation,
  1 - Mathf.Exp(-eyeTrackingSpeed * Time.deltaTime)
);

rightEyeBone.rotation = Quaternion.Slerp(
  rightEyeBone.rotation,
  targetEyeRotation,
  1 - Mathf.Exp(-eyeTrackingSpeed * Time.deltaTime)
);
We will need take a different approach to clamping the eyes. Since we only want to clamp one axis, we can make use of Euler angles, which are another way of representing 3D rotations by defining a number of degrees an object is rotated around each of its three axes. This will let us clamp one axis in local space with ease by operating on only a single component of the Transform.localEulerAngles vector.
Euler angles may be more intuitive to work with, but they have a set of problems which are solved by quaternions. See this article for a more information on this and quaternions in general. Don’t worry, it’s very light on math!
Angles in degrees wrap around every interval of 360, so angles of -90, 270, and 630 are all the same. Unity’s eulerAngles and localEulerAngles are in the 0~360 degree range, but to clamp the angle, we want a -180 ~ 180 interval. This means when the angle passes 180, we want it to wrap around to -180 instead of continuing up to 360. We do this by subtracting 360 from the angle when it passes 180.
// This code is called after we set the rotations in the previous block

float leftEyeCurrentYRotation = leftEyeBone.localEulerAngles.y;
float rightEyeCurrentYRotation = rightEyeBone.localEulerAngles.y;

// Move the rotation to a -180 ~ 180 range
if (leftEyeCurrentYRotation > 180)
{
    leftEyeCurrentYRotation -= 360;
}
if (rightEyeCurrentYRotation > 180)
{
    rightEyeCurrentYRotation -= 360;
}

// Clamp the Y axis rotation
float leftEyeClampedYRotation = Mathf.Clamp(
    leftEyeCurrentYRotation,
    leftEyeMinYRotation,
    leftEyeMaxYRotation
);
float rightEyeClampedYRotation = Mathf.Clamp(
    rightEyeCurrentYRotation,
    rightEyeMinYRotation,
    rightEyeMaxYRotation
);

// Apply the clamped Y rotation without changing the X and Z rotations
leftEyeBone.localEulerAngles = new Vector3(
    leftEyeBone.localEulerAngles.x,
    leftEyeClampedYRotation,
    leftEyeBone.localEulerAngles.z
);
rightEyeBone.localEulerAngles = new Vector3(
    rightEyeBone.localEulerAngles.x,
    rightEyeClampedYRotation,
    rightEyeBone.localEulerAngles.z
);
Leg Stepping
As mentioned in the introduction, we will not be delving into the math behind inverse kinematics, only how to use it. If you don’t have an IK system ready to go, there are many available both on GitHub and the Unity Asset Store. There is also a simple IK script included in the source files for this tutorial.
For this section, we will assume you have a working two bone IK limb with an end point target and pole vector target. If you don’t know what these terms mean, be sure to read the Inverse Kinematics section in the introduction!
It is common to control the pole vector independently, but since we won’t have any complex knee motion, we will have the pole vector share a parent with the IK chain root bone. This means it will rotate with the body and stay in the same place relative to the IK chain root, giving us a consistent elbow direction.
We will also create the target end point transforms in world space (not parented to anything) and place them in sensible foot positions. Once that’s all linked up to the IK solver, we’re ready to go!
This IK setup section has been brief because the setup procedure can differ depending on your IK solution, but the output will be the same. Check your IK solver’s documentation for implementation-specific setup instructions!
Lucky for us, a low speed gecko is about as simple as it gets for leg stepping cycles. Characters with more complex walk cycles generally use keyframes for the motion itself and only use procedural animation for grounding, but we can get away with a simple scripted motion from A to B.
For deciding foot placement positions, we are going to use a home position for each leg. This position will be at the center of the leg’s reachable area, and will share a parent with the shoulder or thigh’s parent bone, just like our pole vector targets. We are going to use it for the foot rotation as well, so we are going to orient it so that it is facing the same way as the foot should at rest.
We are going to use the home position to decide when and where to move the end point target. When the leg goes out of range, we will trigger a step to bring it back to the home position.
Let’s create a new component called LegStepper to handle all the foot logic and put it on the end point target gameobject, then give it a reference to our homeTransform object, plus a couple more values for the step parameters.
using UnityEngine;

public class LegStepper : MonoBehaviour
{
  // The position and rotation we want to stay in range of
  [SerializeField] Transform homeTransform;
  // Stay within this distance of home
  [SerializeField] float wantStepAtDistance;
  // How long a step takes to complete
  [SerializeField] float moveDuration;

  // Is the leg moving?
  public bool Moving;
}
Since we don’t want the step to be instantaneous, we will use a Coroutine. Coroutines let you pause code execution within a method for some amount of time. In this case, we want to pause our step loop for one frame every frame, letting us gradually reach the target.
// Coroutines must return an IEnumerator
IEnumerator MoveToHome()
{
  // Indicate we're moving (used later)
  Moving = true;

  // Store the initial conditions
  Quaternion startRot = transform.rotation;
  Vector3 startPoint = transform.position;

  Quaternion endRot = homeTransform.rotation;
  Vector3 endPoint = homeTransform.position;

  // Time since step started
  float timeElapsed = 0;

  // Here we use a do-while loop so the normalized time goes past 1.0 on the last iteration,
  // placing us at the end position before ending.
  do
  {
    // Add time since last frame to the time elapsed
    timeElapsed += Time.deltaTime;

    float normalizedTime = timeElapsed / moveDuration;

    // Interpolate position and rotation
    transform.position = Vector3.Lerp(startPoint, endPoint,normalizedTime);
    transform.rotation = Quaternion.Slerp(startRot, endRot, normalizedTime);

    // Wait for one frame
    yield return null;
  }
  while (timeElapsed < moveDuration);

  // Done moving
  Moving = false;
}
This block of code will move the leg from its current position and rotation to the home position’s position and rotation over moveDuration seconds. To trigger the coroutine, we will do the distance check in Update, and run it if the leg is out of range.
void Update()
{
  // If we are already moving, don't start another move
  if (Moving) return;

  float distFromHome = Vector3.Distance(transform.position, homeTransform.position);

  // If we are too far off in position or rotation
  if (distFromHome > wantStepAtDistance)
  {
      // Start the step coroutine
      StartCoroutine(MoveToHome());
  }
}
This works, but it’s not very convincing. To juice it up a little, let’s have the leg lift off the ground in a curve, and also overshoot the home position for a larger motion. For the curve we will use a Quadratic Bezier Curve using nested Lerps.
// New variable!
// Fraction of the max distance from home we want to overshoot by
[SerializeField] float stepOvershootFraction;

IEnumerator Move()
{
  Moving = true;

  Vector3 startPoint = transform.position;
  Quaternion startRot = transform.rotation;

  Quaternion endRot = homeTransform.rotation;

  // Directional vector from the foot to the home position
  Vector3 towardHome = (homeTransform.position - transform.position);
  // Total distnace to overshoot by
  float overshootDistance = wantStepAtDistance * stepOvershootFraction;
  Vector3 overshootVector = towardHome * overshootDistance;
  // Since we don't ground the point in this simplified implementation,
  // we restrict the overshoot vector to be level with the ground
  // by projecting it on the world XZ plane.
  overshootVector = Vector3.ProjectOnPlane(overshootVector, Vector3.up);

  // Apply the overshoot
  Vector3 endPoint = homeTransform.position + overshootVector;

  // We want to pass through the center point
  Vector3 centerPoint = (startPoint + endPoint) / 2;
  // But also lift off, so we move it up by half the step distance (arbitrarily)
  centerPoint += homeTransform.up * Vector3.Distance(startPoint, endPoint) / 2f;

  float timeElapsed = 0;
  do
  {
    timeElapsed += Time.deltaTime;
    float normalizedTime = timeElapsed / moveDuration;

    // Quadratic bezier curve
    transform.position =
      Vector3.Lerp(
        Vector3.Lerp(startPoint, centerPoint, normalizedTime),
        Vector3.Lerp(centerPoint, endPoint, normalizedTime),
        normalizedTime
      );

    transform.rotation = Quaternion.Slerp(startRot, endRot, normalizedTime);

    yield return null;
  }
  while (timeElapsed < moveDuration);

  Moving = false;
}
This motion still looks a little underwhelming. The last piece is to add some Easing to the motion. Easing implementations are also ubiquitous, ex. this one here, so we will assume you have one of these available. To apply this to our step, we update our normalizedTime by passing it through the easing function before using it in our curve.
// Put on line 36 in the previous block
normalizedTime = Easing.Cubic.InOut(normalizedTime);
Pretty good, but there is one problem left. Because each leg only considers its own state when deciding whether or not to move, we will sometimes have too many legs up in the air at the same time.
To address this, we need to control all the legs from one place. When moving, lizards will move diagonal pairs of legs at a time, so our goal will be to allow only the front left and back right, or front right and back left legs to move at any given time.
Our legs are currently checking whether or not they want to move in the LegStepper‘s Update() function, but we want to convert this to a function we can call from our GeckoControllerscript. To do this, simply change the Update function in LegStepper to a public function with a different name, ex. public void TryMove().
// Was previously void Update()
public void TryMove()
{
  if (Moving) return;

  float distFromHome = Vector3.Distance(transform.position, homeTransform.position);

  // If we are too far off in position or rotation
  if (distFromHome > wantStepAtDistance)
  {
    StartCoroutine(Move());
  }
}
Back in our GeckoController script, let’s create reference variables for each of the four legs.
[SerializeField] LegStepper frontLeftLegStepper;
[SerializeField] LegStepper frontRightLegStepper;
[SerializeField] LegStepper backLeftLegStepper;
[SerializeField] LegStepper backRightLegStepper;
Then, to drive the legs, we use a Coroutine like we did with the leg stepping sequence. Here we try moving alternating pairs of legs.
// Only allow diagonal leg pairs to step together
IEnumerator LegUpdateCoroutine()
{
  // Run continuously
  while (true)
  {
    // Try moving one diagonal pair of legs
    do
    {
      frontLeftLegStepper.TryMove();
      backRightLegStepper.TryMove();
      // Wait a frame
      yield return null;

      // Stay in this loop while either leg is moving.
      // If only one leg in the pair is moving, the calls to TryMove() will let
      // the other leg move if it wants to.
    } while (backRightLegStepper.Moving || frontLeftLegStepper.Moving);

    // Do the same thing for the other diagonal pair
    do
    {
      frontRightLegStepper.TryMove();
      backLeftLegStepper.TryMove();
      yield return null;
    } while (backLeftLegStepper.Moving || frontRightLegStepper.Moving);
  }
}
This implementation can result in one pair of legs hogging the loop if the gecko is moving too fast for the legs to keep up.
Lastly, we make sure to start the coroutine in the Awake function of GeckoController.
void Awake()
{
    StartCoroutine(LegUpdateCoroutine());
}
Root Motion
Moving our gecko in world space will be a breeze with our system. Since we have set up our animation system in a way where it will react to the world in a self-contained manner, we can treat it as a single object without having to worry about the individual limbs or other elements of the system!
We will be using velocities to update the root position and rotation. We use the input parameters to figure out a target velocity, smoothly move our current velocity toward the target velocity, and finally apply the current velocity to the root.
We are now back in our GeckoController class. First, let’s set up the variables we are going to use.
// How fast we can turn and move full throttle
[SerializeField] float turnSpeed;
[SerializeField] float moveSpeed;
// How fast we will reach the above speeds
[SerializeField] float turnAcceleration;
[SerializeField] float moveAcceleration;
// Try to stay in this range from the target
[SerializeField] float minDistToTarget;
[SerializeField] float maxDistToTarget;
// If we are above this angle from the target, start turning
[SerializeField] float maxAngToTarget;

// World space velocity
Vector3 currentVelocity;
// We are only doing a rotation around the up axis, so we only use a float here
float currentAngularVelocity;
Just like we did in the head tracking, we will be using our smoothing function to reach the target velocities. First, let’s rotate our body toward our target.
void RootMotionUpdate()
{
  // Get the direction toward our target
  Vector3 towardTarget = target.position - transform.position;
  // Vector toward target on the local XZ plane
  Vector3 towardTargetProjected = Vector3.ProjectOnPlane(towardTarget, transform.up);
  // Get the angle from the gecko's forward direction to the direction toward toward our target
  // Here we get the signed angle around the up vector so we know which direction to turn in
  float angToTarget = Vector3.SignedAngle(transform.forward, towardTargetProjected, transform.up);

  float targetAngularVelocity = 0;

  // If we are within the max angle (i.e. approximately facing the target)
  // leave the target angular velocity at zero
  if (Mathf.Abs(angToTarget) > maxAngToTarget)
  {
    // Angles in Unity are clockwise, so a positive angle here means to our right
    if (angToTarget > 0)
    {
      targetAngularVelocity = turnSpeed;
    }
    // Invert angular speed if target is to our left
    else
    {
      targetAngularVelocity = -turnSpeed;
    }
  }

  // Use our smoothing function to gradually change the velocity
  currentAngularVelocity = Mathf.Lerp(
    currentAngularVelocity,
    targetAngularVelocity,
    1 - Mathf.Exp(-turnAcceleration * Time.deltaTime)
  );

  // Rotate the transform around the Y axis in world space,
  // making sure to multiply by delta time to get a consistent angular velocity
  transform.Rotate(0, Time.deltaTime * currentAngularVelocity, 0, Space.World);
}
Then all there’s left is the translation. We use our min and max distance parameters to have Bonehead approach when far away, and back up when too close to the target object.
//// To be placed in the RootMotionUpdate method below the rotation code ////

Vector3 targetVelocity = Vector3.zero;

// Don't move if we're facing away from the target, just rotate in place
if (Mathf.Abs(angToTarget) < 90)
{
  float distToTarget = Vector3.Distance(transform.position, target.position);

  // If we're too far away, approach the target
  if (distToTarget > maxDistToTarget)
  {
    targetVelocity = moveSpeed * towardTargetProjected.normalized;
  }
  // If we're too close, reverse the direction and move away
  else if (distToTarget < minDistToTarget)
  {
    targetVelocity = moveSpeed * -towardTargetProjected.normalized;
  }
}

currentVelocity = Vector3.Lerp(
  currentVelocity,
  targetVelocity,
  1 - Mathf.Exp(-moveAcceleration * Time.deltaTime)
);

// Apply the velocity
transform.position += currentVelocity * Time.deltaTime;
Lastly, don’t forget to call RootMotionUpdate it in the LateUpdate function! Because the head tracking relies on the body’s orientation, we will put the root motion update at the top of the list.
void LateUpdate()
{
  	RootMotionUpdate();
    HeadTrackingUpdate();
    EyeTrackingUpdate();
}
Final Words
There is a huge number of things we can do to improve on this, but this tutorial has to end somewhere! This has been an introduction into pure skeletal bone manipulation, but a large part of procedural animation is building on top of keyed animations, which we may take a look at in a future tutorial.
For more material on this topic, check out David Rosen’s GDC Talk on the Overgrowth procedural animation system, and Joar Jakobsson and James Therrien’s talk on the procedural animation used in Rain World.